
Interlock installation
SupraTile Interlock Installation Guide
This recommended method of Interlock installation has been prepared as a guide only, the information is supplied in good faith but without guarantee as site conditions vary and are beyond our control.
Where to Start
The starting point for the open join tiles should always be as close to the center of the room as possible. The hidden joint tile should start from one corner of the room.
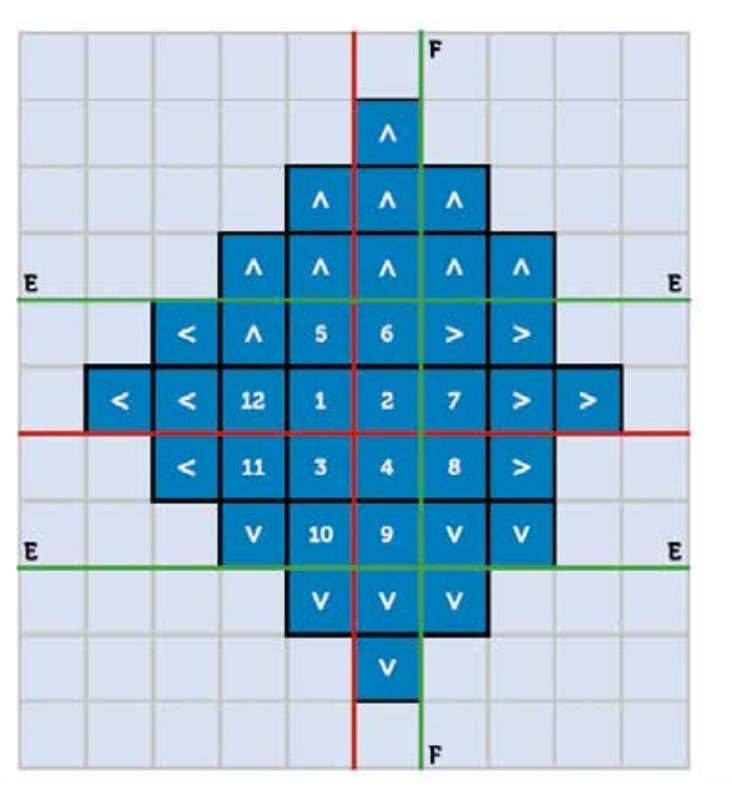
Interlock Installation Instructions for SupraTile Open Joint Tiles
Start from as close to the centre of the room as possible.
Use chalk or laser to create lines A-A and B-B. Make sure these lines are at right angles.
Using the rubber mallet, tap the line together, starting at the corner of the tile & working your way outwards towards the edge of the tile.
Work out in a circular pattern filling in the corners.
Once all full tiles have been installed allow the floor to settle before measuring and fitting finishing cuts. Ensure that you allow at least a 5mm expansion gap between the tiles and any fixed point.
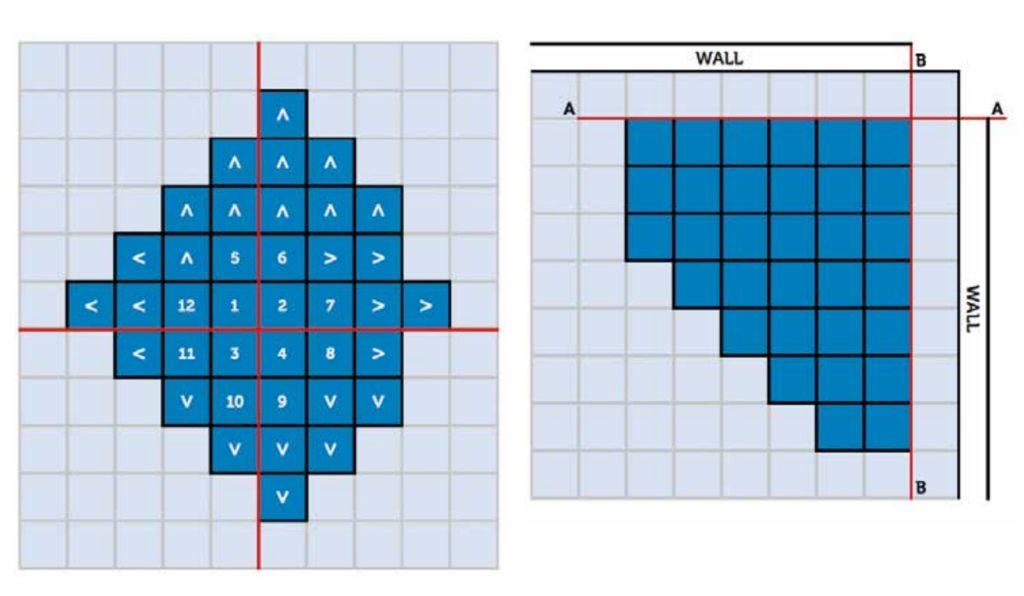
Installation Instructions for SupraTile Hidden Joint Tiles
Carefully measure 20cms out at each end of the wall and use chalk or laser to create lines A-A & B-B. Make sure the lines are at 90 degrees to each other.
Lay the tiles with the hidden join to the walls and the exposed joins on the left. Very important – lay the first few rows perfectly straight, any mistake will impact the entire installation.
Lay the tiles from right to left always placing the hidden edge on top of the exposed. Line up the tabs at the corner to help align tiles. Install one row at a time. completing each row before beginning the next.
Cut in perimeter tiles allowing at least a 5mm expansion gap between the tile and any fixed point.
SupraTile Interlocking Floor Tile Installation video
The complete guide to the install of the SupraTile Interlocking Flooring. If you have any further questions do not hesitate to get in touch.
Download the full installation guide here that includes preparation, maintenance and cleaning advice.
Interlock Installation Instructions for ESD Tiles
ESD contains stainless steel fibers that may be visible on the surface of the tile. This is unavoidable and a fundamental part of the manufacturing process that ensures optimum ESD performance.
Please check the tiles, if the marking is unacceptable do not continue with installation as we will not accept responsibility to replace or refund the cost of any goods after 10m² or more have been installed. To achieve a fully ESD flooring, the tiles need to be grounded. This is achieved by laying a grid of black conductive tape under the dovetail joints of two tiles so that it is in contact with every tile in one direction and 5mm centers in the opposite direction (see below picture).
One grounding point is needed for every 645 to 860 sq ft of SupraTile ESD and / or one grounding point for each separate section / room of SupraTile ESD installed.
Place the grounding point in the corners of the room or along the wall to avoid creating a trip hazard
How to achieve the perfect finish
Leave a minimum of a 5mm gap between the tiles and any fixed point (walls and machinery).
Cover the 5mm expansion gap between the tiles and the walls with skirting profiles.
Undercut wood door jambs and slip the tiles underneath.
With metal door jambs cut the flooring material to within 5mm and then chalk around the jamb.
Use SupraTile ramp and corner sections to create a mat area or provide safe access to wheeled traffic.
The tiles may require gluing if they will be in direct sunlight.
To keep your floor looking good give it a sweep on a regular basis and use a rotary scrubber dryer for routine maintenance.
Following our recommended cleaning and maintenance guide to ensure you’re getting the most out of your SupraTile flooring system.